Set Raspberry Pi for the SSH connection directly by Ethernet
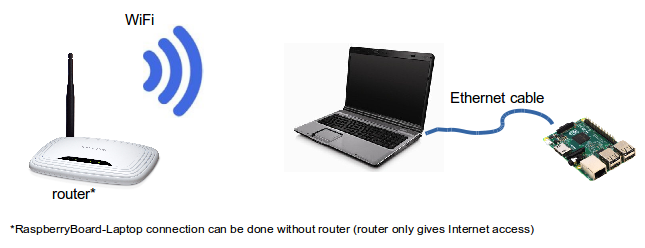
Note: RaspberryBoard-Laptop connection can be done without router (router only gives Internet access).
Scheme of the connection:
On laptop:
1.) Run a recent Ubuntu on PC (I run 14.04).
2.) Set the network-manager on PC.
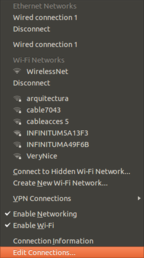
2.1.) On the computer connected to the Internet, click the network icon in the panel and go to "Edit Connections..." at the bottom of the menu.
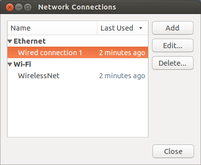
2.2.) Click on "Add" to add new Wired Connection and select "Ethernet" (Leave your wireless connection untouched, the one connected to Internet and the one you want to share, as I understand).
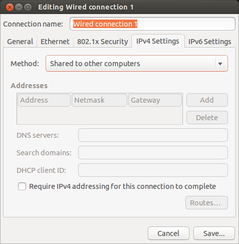
2.3.) In "Ethernet tab", select the correct "Device Mac address". In the "IPv4 Settings tab", select Method: "Shared to other computers".
2.4.) Reconnect clicking on the Wired Network so it gets its new IP address. (The two computers must be connected by an ethernet cable for this step, so connect them now if you have not already).
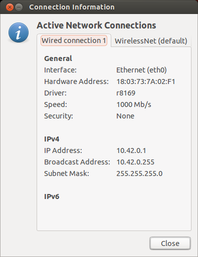
2.5.) Click on "Connection Information" in the network menu and write down the IP address and network mask (in my case it was assigned 10.42.0.1/255.255.255.0 but I do not know if that will always be the case).
3.) Connect an ethernet cable from your computer to the Raspberry Pi.
4.) After being connected to the internet using wifi, clock on your new "shared wifi connection to Raspberry".
On Raspberry Pi Board:
1.) Enable SSH
As of the November 2016 release, Raspbian has the SSH server disabled by default.
In order to enable:
Insert the microSD to PC. Then two partition will be loaded: ("boot" and "62ca0b6d-6291-4c40-b1fd-11bc291e4a38").
Enable SSH by placing a file named “ssh” (without any extension) onto the boot partition of the SD card (it means in the "boot" path). You can use
Then ejected microSD card memory and insert into the Raspberry Board.
2.) Connect through SSH
Then to find the IP address that your laptop has assigned to the Pi type in a terminal:
$ cat /var/lib/misc/dnsmasq.leases
1435006270 b8:27:eb:a5:26:a0 10.42.0.50 raspberry *
There it is: 10.42.0.50 .
Write into the terminal:
$ ssh pi@10.42.0.50
and press Enter, then it will connect and write the password, which is
then, a question will appear [yes/no], select yes.
Done!, Now we are connected to the Raspberry Board through SSH.
Note: If this Warning appears: " WARNING: REMOTE HOST IDENTIFICATION HAS CHANGED! ", so follow the recommendation that appears in the Warning: " remove with: ssh-keygen -f "/home/dennis/.ssh/known_hosts" -R 10.42.0.50 " .
3.) verify the connection to Internet
In addition, to verify that you can connect to the Internet, update the OS:
pi@raspberry:~$ sudo apt-get update
Resources
- http://askubuntu.com/questions/359856/share-wireless-internet-connection-through-ethernet.
- http://www.muonhunter.com/blog/direct-ethernet-connection-to-a-raspberry-pi-under-ubuntu.
- https://hackernoon.com/raspberry-pi-headless-install-462ccabd75d0.