Using Raspberry Pi GPIO ports in C/C++ with WiringPi library
Connect to RPI with SSH and Xephyr
We will use Raspbian Jessie.
First, on Ubuntu:
$ Xephyr -ac -br -keybd ephyr,,,xkbmodel=pc105,xkblayout=es -noreset -screen 1280x720 :1
Then, on RPI:
$ DISPLAY=:1 ssh -Y pi@10.42.0.246
$ startlxde
Installing Wiring Pi libraries
Update and upgrade the system:
$ sudo apt-get update
$ sudo apt-get upgrade
Install Git:
$ sudo apt-get install git-core
Clone Wiring Pi from GitHub:
$ cd ~
$ git clone git://git.drogon.net/wiringPi
Go to the folder and pull:
$ cd wiringPi
$ git pull origin
Then, compile Wiring Pi:
$ sudo ./build
That's all!!, you can verify that Wiring Pi is installed correctly and chech the version:
$ gpio -v
gpio version: 2.44
Copyright (c) 2012-2017 Gordon Henderson
This is free software with ABSOLUTELY NO WARRANTY.
For details type: gpio -warranty

Raspberry Pi Details:
  Type: Pi 3, Revision: 02, Memory: 1024MB, Maker: Embest
  * Device tree is enabled.
  *--> Raspberry Pi 3 Model B Rev 1.2
  * This Raspberry Pi supports user-level GPIO access.
Example: Controlling led in C/C++ with Wiring Pi
Check the pins of the RPi 3:
$ gpio readall
 +-----+-----+---------+------+---+---Pi 3---+---+------+---------+-----+-----+
 | BCM | wPi |   Name  | Mode | V | Physical | V | Mode | Name    | wPi | BCM |
 +-----+-----+---------+------+---+----++----+---+------+---------+-----+-----+
 |     |     |    3.3v |      |   |  1 || 2  |   |      | 5v      |     |     |
 |   2 |   8 |   SDA.1 |   IN | 1 |  3 || 4  |   |      | 5v      |     |     |
 |   3 |   9 |   SCL.1 |   IN | 1 |  5 || 6  |   |      | 0v      |     |     |
 |   4 |   7 | GPIO. 7 |   IN | 1 |  7 || 8  | 1 | IN   | TxD     | 15  | 14  |
 |     |     |      0v |      |   |  9 || 10 | 1 | IN   | RxD     | 16  | 15  |
 |  17 |   0 | GPIO. 0 |   IN | 0 | 11 || 12 | 0 | IN   | GPIO. 1 | 1   | 18  |
 |  27 |   2 | GPIO. 2 |   IN | 0 | 13 || 14 |   |      | 0v      |     |     |
 |  22 |   3 | GPIO. 3 |   IN | 0 | 15 || 16 | 0 | IN   | GPIO. 4 | 4   | 23  |
 |     |     |    3.3v |      |   | 17 || 18 | 0 | IN   | GPIO. 5 | 5   | 24  |
 |  10 |  12 |    MOSI |   IN | 0 | 19 || 20 |   |      | 0v      |     |     |
 |   9 |  13 |    MISO |   IN | 0 | 21 || 22 | 0 | IN   | GPIO. 6 | 6   | 25  |
 |  11 |  14 |    SCLK |   IN | 0 | 23 || 24 | 1 | IN   | CE0     | 10  | 8   |
 |     |     |      0v |      |   | 25 || 26 | 1 | IN   | CE1     | 11  | 7   |
 |   0 |  30 |   SDA.0 |   IN | 1 | 27 || 28 | 1 | IN   | SCL.0   | 31  | 1   |
 |   5 |  21 | GPIO.21 |   IN | 1 | 29 || 30 |   |      | 0v      |     |     |
 |   6 |  22 | GPIO.22 |   IN | 1 | 31 || 32 | 0 | IN   | GPIO.26 | 26  | 12  |
 |  13 |  23 | GPIO.23 |   IN | 0 | 33 || 34 |   |      | 0v      |     |     |
 |  19 |  24 | GPIO.24 |   IN | 0 | 35 || 36 | 0 | IN   | GPIO.27 | 27  | 16  |
 |  26 |  25 | GPIO.25 |   IN | 0 | 37 || 38 | 0 | IN   | GPIO.28 | 28  | 20  |
 |     |     |      0v |      |   | 39 || 40 | 0 | IN   | GPIO.29 | 29  | 21  |
 +-----+-----+---------+------+---+----++----+---+------+---------+-----+-----+
 | BCM | wPi |   Name  | Mode | V | Physical | V | Mode | Name    | wPi | BCM |
 +-----+-----+---------+------+---+---Pi 3---+---+------+---------+-----+-----+
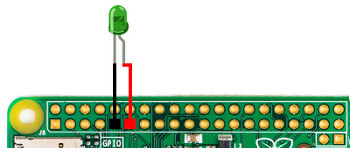
Use the next connection for wiring:
Create the file
#include <wiringPi.h>
int main (void)
{
  wiringPiSetup();
  pinMode(0, OUTPUT);
  int i = 0;
  for (i = 0;i<10;i++){
    digitalWrite(0, HIGH);
    delay(500);
    digitalWrite(0, LOW);
    delay(500);
  }
  return 0 ;
}
Compile
$ gcc -Wall -o blink blink.c -lwiringPi
Or compile
$ gcc -Wall -o blink blink.cpp -lwiringPi
Execute using:
$ sudo ./blink
Resources
- http://www.mnp.cl/post/instalar-wiringpi-raspberry-pi-gpio-c.
- http://www.mnp.cl/post/controlar-led-gpio-raspberry-pi-c.